Table of content
EMT Conduit Bending Guide: Navigating the Basics
Welcome to our comprehensive guide on EMT conduit bending. Whether you're a master electrician or an apprentice, understanding how to bend Electrical Metallic Tubing (EMT) conduit is a fundamental skill.
EMT conduit protects and routes electrical wiring in residential, commercial, and industrial settings. Bending EMT conduit accurately and efficiently is crucial for creating safe and effective electrical installations.
In this guide, we'll take you through the essentials of EMT conduit bending, from the tools you'll need to the techniques required for precise bends. We'll provide step-by-step instructions, tips, and tricks to ensure you can confidently work with EMT conduit on your electrical projects.
Whether you want to expand your skillset or refresh your knowledge, this guide is here to help you master the art of EMT conduit bending.
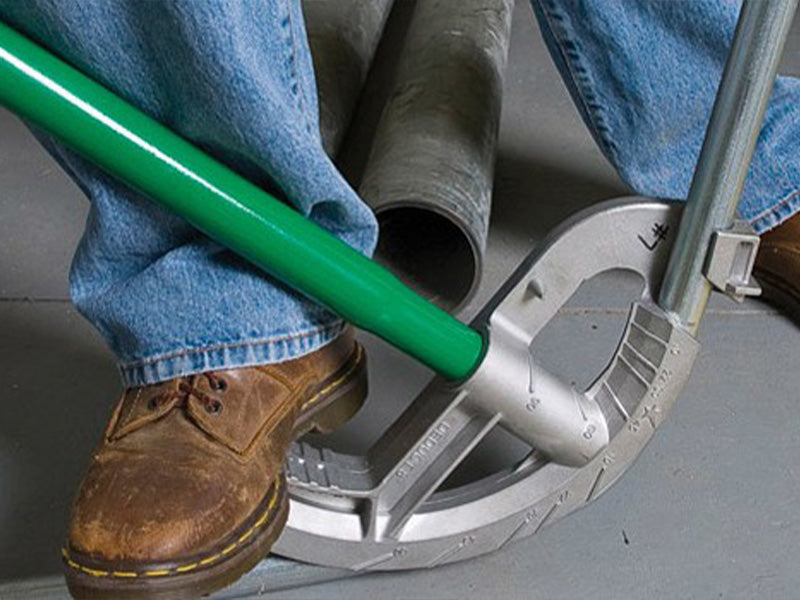
What is an EMT Bender?
An EMT conduit bender is a handheld device designed to reshape the EMT conduit conveniently. To use it, simply insert the conduit into the bender's head and follow the provided guides. Then, apply the foot pedal or manual force to bend the metal pipe to your desired angle. The bender's extended handle also serves for straightening conduit when needed.
Conduit Bender Diagram
Check out the conduit bender diagram to identify the bender's fundamental section, which will guide you in selecting the desired type of bend.
- Rim Notch or Teardrop:
- Purpose: To locate the center of a 3-point saddle bend
- Action: Mark the conduit at the designated point.
- Arrow:
- Purpose: Used for aligning the offset and outer marks during a saddle bend.
- Action: Insert the conduit into the bender, ensuring the arrow aligns precisely with the bending mark.
- Star:
- Purpose: Indicates the back of a 90° bend, typically for back-to-back bends.
- Action: Place one foot on the bender, apply firm foot pressure on the bending shoe, and maintain this pressure throughout the bend.
- Degree Marks:
- Purpose: To determine the angle of the pipe bend.
- Action: Look along the line of sight as indicated, and cease bending when the pin aligns with the appropriate angle mark.
Pro-Tip:
As the age-old saying goes, measure TWICE, bend ONCE.

Bending with the Handle Up
Bending with the handle in the upward position is efficient when working with larger diameter conduits, typically in the 1" to 1½" range. Employing the foot lever generates greater force for bending the conduit.
- Place the bender head on the ground, aligning the handle with your body.
- Insert the conduit into the bend hook and align the arrow with the bending mark.
- Grasp the handle securely and assume a stable stance.
- Apply substantial foot pressure on the pedal, ensuring consistent pressure. Keep the bend shoe flat and aligned with the conduit.
- Maintain focus by looking straight down during the bend, stopping when the Site-Rite pin aligns with the appropriate angle mark.
- Inspect the final bend for accuracy.

Bending with the Handle Down
Bending handle down is ideal for smaller conduit diameters (½" and ¾"), requiring less bending force. To ensure safety, minimize the risk of falling, and achieve precise bends, it's important to properly support both the bender and conduit while maintaining a stable stance.
- Place the handle end on the ground between your feet, with the bending hook facing away from you.
- Insert the conduit, directing the end toward the bend hook and aligning the arrow with the bending mark.
- Brace the handle with your foot to prevent shifting and maintain the bending mark alignment.
- Stand close to the bender, secure the conduit under your arm, and apply consistent pressure.
- Bend until the bottom edge of the conduit aligns with the desired angle mark.

How to Make a 90° Bend

Creating a precise 90° bend in EMT conduit, often referred to as a "stub up" or an accurate stub, involves a few essential steps:
The 90-degree bend, often called an accurate stub, is the fundamental starting point for bending conduit. Beginners usually begin with this bend because it's straightforward and frequently used. To make a perfect 90-degree bend, you'll need to understand two key factors:
Take Up: This is the amount of conduit required for the bend.
Height Stub Up: It measures the distance from the bottom of the 90-degree bend to the end of the conduit.
Follow these simple steps to create your 90-degree bend:
- Place the bender on the ground with the handle pointing upward and insert the conduit's end into the bender.
- Utilize the bender's markings to locate the start and end of the 90-degree bend by marking the stub length on the conduit (Mark A).
- Subtract the Deduct length from Mark A to determine Mark B.
- Position the EMT into the bender, ensuring the mark lines up with the arrow.
- Apply steady foot pressure on the backside of the remaining conduit on the floor while placing your other foot on the bender's heel. Slowly bend the conduit until it reaches a 90-degree angle, ensuring the back lines up with the star symbol on the bender.
Example: Suppose you have a 10-foot section of EMT conduit and must make a 90-degree bend. Begin by measuring an 8-inch height stub up and marking it on the conduit. Lay the conduit on the ground, aligning the mark with the bender's arrow. Stand with one foot on the ground and the other on the bender's heel, applying even pressure as you bend the conduit upwards. Watch the degree marks on the bender, and when it reaches a perfect 90 degrees, stop bending.

These steps will help you master the basic 90-degree bend without unnecessary complexity, and help your bends look like this.
How to Bend a Box Offset with an EMT Bender

A box offset is a common technique in electrical conduit work that involves creating a small Z-shaped bend to connect conduit and an outlet box. To perform this maneuver, follow these steps:
- Calculate the Center-to-Center Distance: Consider the obstruction by measuring the distance between your intended bends.
- Mark the Start of the First Bend (MARK A): Measure the distance from the conduit's end to where you want the first bend to begin.
- Measure the Center-to-Center Distance (MARK B): Determine the distance between Mark A and the next bend.
- Position for the First Bend: Insert the conduit through the appropriate bend hook and align Mark A with the arrow on the bender. Bend the conduit to your desired angle.
- Rotate and Align for the Second Bend: Turn the conduit 180 degrees and align MARK B with the bender's arrow. Bend the conduit to match the same angle as the first bend.
How to Bend an Offset in Conduit

Creating an offset in conduit, a technique that transforms a straight section into a Z-shaped configuration, is invaluable when navigating obstacles and adjusting for elevation changes. This process involves several steps:
- Marking the Conduit: Begin by calculating and marking the point where you intend to create the offset. This mark will serve as your reference for the bend.
- Positioning for the First Bend: Lay the conduit on the ground, ensuring it's aligned with the bender's arrow at the initial mark you made. This is the starting point for your 45-degree bend.
- Making the First Bend: Apply controlled force to the bender, bending the conduit 45 degrees. This initial bend lays the foundation for the Z-shaped offset.
- Inverting the Bender: Turn the bender upside down and rotate the conduit within the bender by 180 degrees. This step prepares the conduit for the second portion of the offset.
- Completing the Offset: Use your foot to brace the handle securely with the pipe in the same plane as the bender's handle. Then, apply downward pressure to the end of the pipe. Continue bending until the offset reaches 45 degrees on the bender.
Pro-Tip:
Remember these three key tips for successful conduit bending:
- Secure the conduit with firm foot pressure for floor bending.
- When bending in the air, apply pressure close to your body.
- If you accidentally overbend, utilize the back pusher or the expanded end of the bender handle to rectify and align the conduit correctly for the task at hand.
Want to enhance work productivity and speed?

For creating offsets in conduit, the standard Greenlee hand bender is a reliable choice. However, if you're looking to expedite your work, Greenlee Tools offers specialized benders designed for offsets.
These include:
These benders simplify the offset bending process. With a straightforward single operation, you can insert the conduit, depress the handle, release it, and then remove the conduit. The result is consistent, and identical offsets every time. This feature is handy for wall-mounted boxes where exposed conduit needs precise offsets.
Bending Back-to-Back 90-Degree Bends for EMT Conduit

Performing a back-to-back bend, which results in a U-shaped configuration for your conduit, is a valuable technique when navigating vertical and horizontal surfaces.
Here are the steps to achieving this bend:
- Measure and Calculate: Start by measuring the distance between the two parallel surfaces where you plan to install the conduit. This measurement will determine the spacing between the two stubs used for the back-to-back bends.
- Prepare for the First Bend and Position the Conduit: Establish the first stub by marking the location for the back of the second bend along the free end of the conduit, using the distance you measured in step one. Then, insert the marked section of the conduit into the bender, ensuring it aligns perfectly with the "star" on the bender.
- Applying Pressure: Steadily press down on the conduit to hold it in place while pushing your foot on the bender's heel. Continue bending the conduit until the end aligns with the arrow on the bender, indicating the completion of the first 90-degree angle.
- Set the Finish Line:Fit the bent conduit into its intended location and mark the Finish Line on the conduit, corresponding to the bending mark.
- Finalize the Second Bend: Align the bending mark on the conduit with the tip of the star on the bender. Apply pressure to the conduit to hold it in place, then use your foot on the bender's heel to bend the conduit to a precise 90-degree angle.
How to Bend a 3-Point Saddle with an EMT Conduit Bender

A 3-bend saddle created with an EMT conduit bender, like an offset, serves the purpose of navigating around an obstacle. This particular saddle involves three bends. The first and last bends are the same degree, while the center bend is twice the number of degrees of the other two bends.
Saddle Bend Measurements:
- A represents the center point for the finished saddle bend.
- B is the measurement that's double the diameter of A.
- C is another measurement that's double the diameter of A.
Creating a Three Point Saddle Bend:
- Initial Calculation:Begin by calculating and marking the exact location where you intend to make the bend.
- Align for the First Bend: Insert the conduit into the bender until the A mark on the tube aligns perfectly with the notch on the bender.
- Making the First Bend: Apply force to the pipe near the bender and bend the C side to a 45-degree angle. A 45-degree bend is achieved when the bender handle forms a right angle to the tube.
- Reverse and Align for Second Bend:Reverse the tube in the bender.
- Create the Backward Bend:Form a backward or return bend.
- Repeat for C Mark: Repeat steps 4 and 5, aligning with the C mark, to achieve the desired bend.
- Proper Alignment for Final Result: Ensure the A, B, and C guidelines are aligned correctly. This will result in the remaining conduit returning to a straight line.
These saddle bends are essential for avoiding obstructions and keeping the conduit in the same plane after maneuvering around obstacles. The measurements and precise steps are crucial to achieving accurate results.
How to Straighten a Conduit Bend
To straighten a conduit bend, follow these steps:
- Insert one pipe end into the bender's handle.
- Secure the pipe and smoothly push the bender down to the floor in a single, continuous motion.
EMT Conduit Guide Frequently Asked Questions
What is an EMT Conduit, and Why is Bending It Important?
EMT (Electrical Metallic Tubing) is a conduit to protect and route electrical wiring. Bending it is crucial to accommodate the layout and installation of electrical systems.
What's the general guideline for conduit bend radius?
The guideline states that there should be no more than the equivalent of four-quarter bends (360 degrees) between pull points, such as conduit bodies and boxes. This rule aims to prevent damage to the insulation around the conductors, especially when pulling them in or out.
What's the minimum bend radius for an EMT conduit?
According to Chapter 9, Table 2, a 2-inch EMT conduit's minimum bending radius is 12 inches. Interestingly, certain online pre-bent conduits deviate from this standard, with a radius of 9.5 inches for a 2-inch EMT in the example provided.
Can EMT Conduit be bent in extreme temperatures?
EMT conduit can be bent in a range of temperatures. However, extreme cold can make it more brittle, while extreme heat can affect the integrity of the conduit.
How can I ensure my EMT conduit bend is accurate?
To ensure accuracy, use a level to check that the conduit is bending at the desired angle. Measure and mark the conduit correctly before bending to avoid errors.